 |
| No, I was not going in for a landing. |
It was too late when I realized that my 'brilliant solution' killed my aerodynamics. I essentially put a giant damn in front of a very important stream of air. We hypothesized that the bar would not affect lift nearly as it would affect drag, since the airflow on top of the wing tends to play a bigger role in lift. With the help of my friend, Brent, we used computer programs to analyze my airfoil.
 |
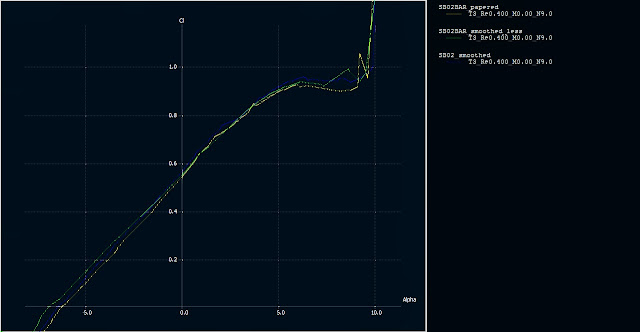
| Fig.1: Lift vs Angle of Attack (cl vs. alpha) |
In the following graphs, we compared the original airfoil (blue), with the addition of the spar (green), and if we aerodynamically covered the spar with a sheet of paper (yellow).
 |
| Fig. 2 Glide-slope vs. Angle of Attack ( cl/cd vs. alpha ) |
In figure 2, we plotted the lift over drag versus the angle of attack. Lift over drag (L/D or cl/cd) can help us evaluate the performance of the aircraft, including the maximum range and glide-slope. Naturally, increasing the L/D increases the range and gives you a flatter glide-slope.
What concerned me was the large increase in drag figure #2 was indicating from the addition of the wooden beam. I was losing 30% of my glide slope. Fortunately, the yellow line indicates that I can recover most of my cl/cd by covering the bar with an aerodynamically shaped piece of paper.
After noticing the high amounts of drag, I realized that my power plant was severely insufficient. While I could hold steady flight, there was no thrust available when I needed extra lift for a maneuver. Luckily we found a much larger brushless motor, and upgraded the battery and prop from a 3 to 4 cell and 8" to a 12" diam. prop respectively.
 |
| Comparison of the old components on top of the new. |
As can be seen in the comparison, the overhaul also bought more mass. Generating enough lift was no problem, rather the new center of gravity was. If the battery was placed in the far back of the compartment, the balance was tolerable but far from optimal.
Other than needing a little bit of trim, the plane flew great. It what on that test flight, my worries finally melted away, and I learned to just have fun. The plane responded easily to any input give, and it could pull out of any mistake. I felt this plane was finally deemed flyable.